 ArduinoとFlashで通信するときには、それ用のライブラリ使ったり、C#で作ったProxy的アプリを使ってたりしたんだけど、どうもめんどくさい。誰かANE作ってる人いないかなーって思ってたら、いた。あるといいながあった。
そんなわけで、Arduinoとシリアル通信をするためのANEのFlashDevelopでの設定手順を紹介します。
◆実行例
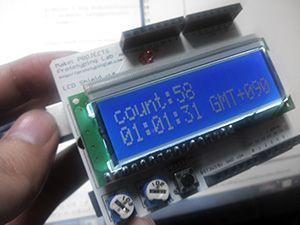
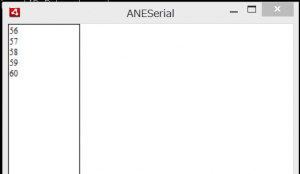
Arduinoからは定期的にSerial.println(count);で投げていて、AIRからはステージをクリックすると、時刻をArduinoに投げるだけの単純なもの。
◆準備
ダウンロードする。
・as3-ArduinoConnector-1-5-0.zip
https://github.com/quetwo/as3-arduino-connector
・pthreadGC2.dll
https://code.google.com/p/as3-arduino-connector/
・libgcc_s_dw2-1.dll
http://sourceforge.jp/projects/sfnet_openmarias/downloads/libgcc_s_dw2-1.dll/
◆プロジェクトを作る
新規プロジェクトウィンドウを出して、「AIR AS3 Projector」を選びます。
ここでは「ANESerial」にしました。
◆ライブラリの認識
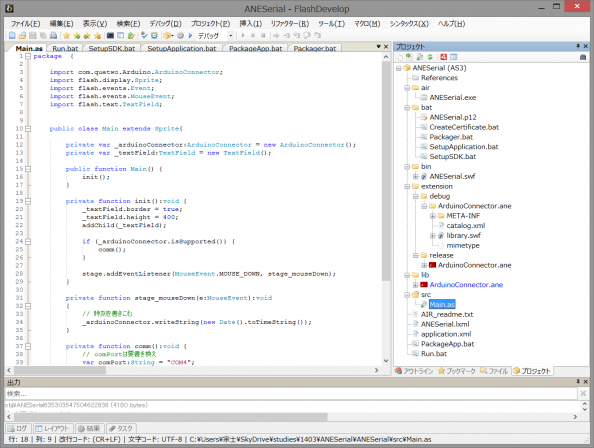
ダウンロードしたファイル内の「ArduinoConnector.ane」を、libディレクトリを作って、ライブラリに追加します。
プロジェクトディレクトリ下に「extension」ディレクトリ、さらにその下に、「release」と「debug」ディレクトリを作ります。
releaseとdebug両方のディレクトリにbinaries内の「ArduinoConnector.ane」を追加します。
debugディレクトリのほうは、拡張子をzipにして、解凍します。
そして解凍したディレクトリを「ArduinoConnector.ane」という名前にします。
ArduinoConnector.zipは不要なので、削除します。
◆dllライブラリの認識
pthreadGC2.dllとlibgcc_s_dw2-1.dllは、「C:\Windows\SysWOW64」内に配置します。32bit環境では「C:\Windows\System32」内に配置するようです。
参考:GhostWire Studios Flash UI Components » FlashDevelop, Flex SDK, Windows 7, Missing DLL
http://www.ghostwire.com/blog/archives/flashdevelop-flex-sdk-windows-7-missing-dll/
◆Arduinoのスケッチを記述
|
1 2 3 4 5 6 7 8 9 10 11 12 13 14 15 16 17 18 19 20 21 22 23 24 25 26 27 28 29 30 31 |
#include <LiquidCrystal.h> int count = 0; LiquidCrystal lcd(12, 11, 5, 4, 3, 2); void setup() { lcd.begin(16, 2); lcd.print("count:"); Serial.begin(9600); } void loop() { count ++; lcd.setCursor(6, 0); lcd.print(count); // シリアル受信した文字列がある場合は // LCDの書き込み開始位置を二行目に指定します。 if(Serial.available() > -1){ lcd.setCursor(0, 1); } // シリアル受信した文字列がある間は繰り返し処理をします。 while (Serial.available()) { // lcdに書き込みます。 lcd.write(Serial.read()); } Serial.println(count); delay(1000); } |
◆Main.asを記述
次のコードを記述します。
comPortは自分の環境に合わせて書き換えてください。
参考:ANEを使ってAIRアプリ単体でArduinoと通信する – いつきの技的日記
http://d.hatena.ne.jp/itsuki_kosen/20130513/1368455674
Leonardo系の場合は、connectの第三引数にtrueを入れるようです。
http://www.viva-mambo.co.jp/jp/labo/2014/07/arduino-leopardo.html
|
1 2 3 4 5 6 7 8 9 10 11 12 13 14 15 16 17 18 19 20 21 22 23 24 25 26 27 28 29 30 31 32 33 34 35 36 37 38 39 40 41 42 43 44 45 46 47 48 49 50 51 |
package { import com.quetwo.Arduino.ArduinoConnector; import flash.display.Sprite; import flash.events.Event; import flash.events.MouseEvent; import flash.text.TextField; public class Main extends Sprite{ private var _arduinoConnector:ArduinoConnector = new ArduinoConnector(); private var _textField:TextField = new TextField(); public function Main() { init(); } private function init():void { _textField.border = true; _textField.height = 400; addChild(_textField); if (_arduinoConnector.isSupported()) { comm(); } stage.addEventListener(MouseEvent.MOUSE_DOWN, stage_mouseDown); } private function stage_mouseDown(e:MouseEvent):void { // 時刻を書きこむ _arduinoConnector.writeString(new Date().toTimeString()); } private function comm():void { // comPortは要書き換え var comPort:String = "COM4"; var baud:int = 9600; _arduinoConnector.connect(comPort, baud); _arduinoConnector.addEventListener("socketData", arduinoConnector_socketdata); } private function arduinoConnector_socketdata(e:Event):void { // 送られてきた文字を表示 _textField.appendText(_arduinoConnector.readBytesAsString()); } } } |
◆application.xmlの記述
23~27行目を追加します。
|
1 2 3 4 5 6 7 8 9 10 11 12 13 14 15 16 17 18 19 20 21 22 23 24 25 26 27 28 29 30 31 32 |
<?xml version="1.0" encoding="utf-8" ?> <application xmlns="http://ns.adobe.com/air/application/3.9"> <id>ANESerial</id> <versionNumber>1.0</versionNumber> <filename>ANESerial</filename> <name>ANESerial</name> <description></description> <copyright></copyright> <initialWindow> <title>ANESerial</title> <content>ANESerial.swf</content> <systemChrome>standard</systemChrome> <transparent>false</transparent> <visible>true</visible> <minimizable>true</minimizable> <maximizable>true</maximizable> <resizable>true</resizable> </initialWindow> <supportedProfiles>extendedDesktop</supportedProfiles> <extensions> <extensionID>com.quetwo.Arduino.ArduinoConnector</extensionID> </extensions> <!-- More options: http://livedocs.adobe.com/flex/3/html/File_formats_1.html#1043413 --> </application> |
◆Run.batの記述
10行目に
|
1 |
-extdir extension/debug/ |
を追加します。
|
1 2 3 4 5 6 7 8 9 10 11 12 13 14 15 16 17 |
@echo off set PAUSE_ERRORS=1 call bat\SetupSDK.bat call bat\SetupApplication.bat echo. echo Starting AIR Debug Launcher... echo. adl "%APP_XML%" "%APP_DIR%" -extdir extension/debug/ if errorlevel 1 goto error goto end :error pause :end |
◆動作確認
以上でデバッグは出来るようになっているはずです。
動かなければ、Flex SDK 4.6以上であることを確認してください。
◆bat/Packager.batの記述
6行目の拡張子部分をexeにし、
11行目を次のように書き換えます。
|
1 |
call adt -package -XnoAneValidate -tsa none %OPTIONS% %SIGNING_OPTIONS% -target native %OUTPUT% %APP_XML% %FILE_OR_DIR% -extdir extension/release/ |
|
1 2 3 4 5 6 7 8 9 10 11 12 13 14 15 16 17 18 19 20 21 22 23 24 25 26 27 28 29 30 31 32 33 34 35 36 |
@echo off if not exist %CERT_FILE% goto certificate :: AIR output if not exist %AIR_PATH% md %AIR_PATH% set OUTPUT=%AIR_PATH%\%AIR_NAME%%AIR_TARGET%.exe :: Package echo. echo Packaging %AIR_NAME%%AIR_TARGET%.air using certificate %CERT_FILE%... call adt -package -XnoAneValidate -tsa none %OPTIONS% %SIGNING_OPTIONS% -target native %OUTPUT% %APP_XML% %FILE_OR_DIR% -extdir extension/release/ if errorlevel 1 goto failed goto end :certificate echo. echo Certificate not found: %CERT_FILE% echo. echo Troubleshooting: echo - generate a default certificate using 'bat\CreateCertificate.bat' echo. if %PAUSE_ERRORS%==1 pause exit :failed echo AIR setup creation FAILED. echo. echo Troubleshooting: echo - did you build your project in FlashDevelop? echo - verify AIR SDK target version in %APP_XML% echo. if %PAUSE_ERRORS%==1 pause exit :end echo. |
◆PackageApp.batの記述
8行目に「-tsa none」の記述がある場合は削除します。
|
1 |
set OPTIONS=-tsa none |
|
1 2 3 4 5 6 7 8 9 10 11 |
@echo off set PAUSE_ERRORS=1 call bat\SetupSDK.bat call bat\SetupApplication.bat set AIR_TARGET= ::set AIR_TARGET=-captive-runtime set OPTIONS= call bat\Packager.bat pause |
◆開発用証明書の P12 ファイルの作成
bat/CreateCertificate.batを実行します。
「ANESerial.p12」ファイルが生成されます。
◆AIRアプリケーションファイルの生成
PackageApp.batの実行をします。
airディレクトリ内に、「ANESerial.exe」が生成されます。
実行すると、インストールされます。
