
2013/2/15にアドビシステムズセミナールームにて行われた第一回CreateJS勉強会の発表内容です。当日はASer、JSerともにいらっしゃるだろうとの予想のもと、
- ASerの方向けにFlashDevelop
- JSerの方向けにPhpStorm
を使用した簡単なデモを用意しておき、それをお見せしました。この記事はその2つの内のFlashDevelop版です。
まず、FlashDevelopの特徴を簡単に説明すると以下のようになります。
- FlashDeveloperの方にはお馴染み
- とにかくコード補完が最強
- 無料
- Windows版のみ
- 最近ではHaxeのエディタとしても使用されている
ダウンロードは以下のサイトから可能です。
http://www.flashdevelop.org/
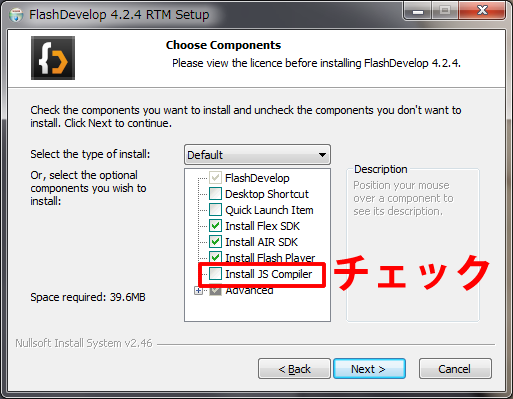
インストールは非常に簡単で.exeファイルを実行するだけなのですが、一点だけ注意点があります。インストール中に以下の画面が出てくるのですが、ここでInstall JS Compilerに必ずチェックを入れて下さい。デフォルトではチェックが入っていません。これを忘れてしまうと当然ながらJavaScriptを書き出すことが出来ません。
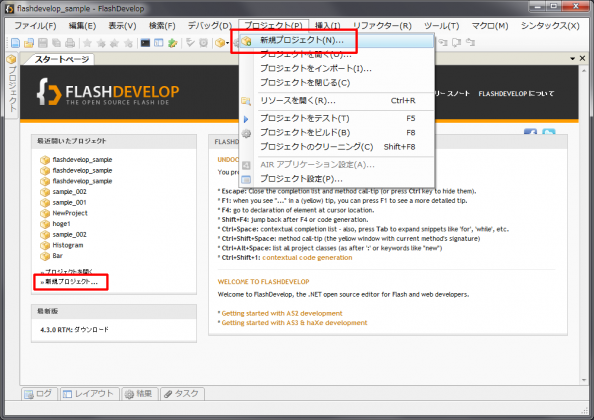
ではCreateJSのプロジェクトを作成してみましょう。メニュー→プロジェクト→新規プロジェクト、あるいはスタートページの新規プロジェクトをクリックします。
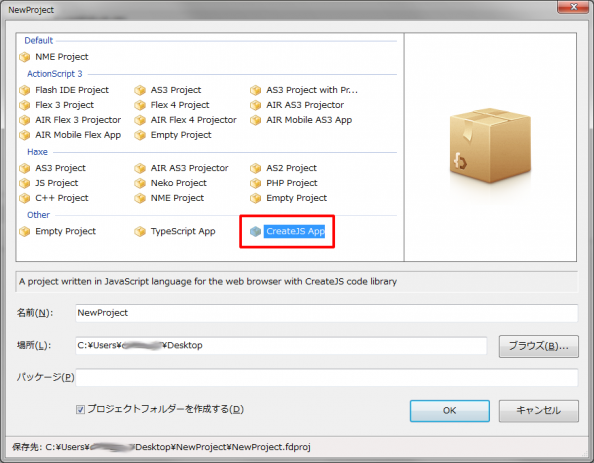
するとこの様なウィンドウが開きますので、CreateJS Appをクリックしてプロジェクトファイルを作成して下さい。
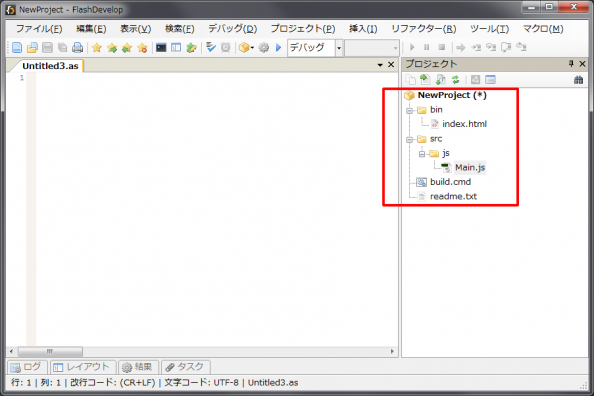
作成されたプロジェクトを確認すると以下の様な構造になっている事が確認できます。
- bin/index.html
- src/js/Main.js
ではindex.htmlから見ていきましょう。ヘッダーではCreateJSの各種ライブラリの読み込みと、何やら”プロジェクト名.js”というファイルの読み込みが行われています。この”プロジェクト名.js”はコンパイル時に書き出されるJavaScriptファイルです。
|
1 2 3 4 5 6 7 8 |
<head> <script src="http://code.createjs.com/easeljs-0.5.0.min.js"></script> <script src="http://code.createjs.com/tweenjs-0.3.0.min.js"></script> <script src="http://code.createjs.com/soundjs-0.3.0.min.js"></script> <script src="http://code.createjs.com/preloadjs-0.2.0.min.js"></script> <script src="http://code.createjs.com/movieclip-0.5.0.min.js"></script> <script src="NewProject.js"></script> </head> |
bodyではCanvasの配置、Main.jsのmainファンクションの呼び出しが行われています。
|
1 2 3 4 5 6 |
<body> <canvas id="mainCanvas" width="800" height="500"></canvas> <script> Main.main(); </script> </body> |
次にMain.jsを見ていきます。
|
1 2 3 4 5 6 7 8 9 10 11 12 13 14 15 16 17 18 19 20 21 22 23 24 25 26 27 28 29 30 31 32 33 34 35 36 37 38 39 40 41 42 43 44 45 46 47 48 49 50 51 52 53 54 55 56 57 58 59 60 61 62 |
/** @define {string} */ var BUILD = "debug"; (function(){ /** * Main class of the app. */ function Main(){} /** * Entry point of the app. */ Main.main = function() { var main = new Main(); if (!window.HTMLCanvasElement) { alert("Your browser does not support HTML5 Canvas."); return; } else main.initialize(); // entry point } /** * Initializes the basics of the app. */ Main.prototype.initialize = function() { /** * mainCanvas */ this.mainCanvas = document.getElementById("mainCanvas"); /** * mainStage */ this.mainStage = new createjs.Stage(this.mainCanvas); this.mainStage.snapToPixelsEnabled = true; /* * createjs */ createjs.Ticker.addListener(this); createjs.Ticker.useRAF = true; createjs.Ticker.setFPS(60); } /** * Updates the stage on Ticker tick. * @param event The recieved tick event. */ Main.prototype.tick = function(event) { this.mainStage.update(); } /** * Expose class. */ window.Main = Main; })(); |
少々長いのですが、22行目でmain.initialize()とあり初期化を行っていることわかり、その内容が29行目から46行目に書かれています。初期化の内容としては、
|
1 2 3 4 5 6 |
//idをもとにCanvasの取得 this.mainCanvas = document.getElementById("mainCanvas"); //CanvasからStageの作成 this.mainStage = new createjs.Stage(this.mainCanvas); //ループ関数の定義 createjs.Ticker.addListener(this); |
となります。最後のTickerとはActionScript3.0でいうとEnterFrame、JavaScriptでいうとrequestAnimationFrameまたはsetTimeoutです。コールバック関数は52行目から55行目です。
さて、少し上に戻って23行目を見てみると// entry pointとあるので、ここに取りあえず円を描いてみたいと思います。以下のコードを書き加えてCtrl + Enterのショートカットで書き出してみます。
|
1 2 3 4 5 6 7 8 9 |
//円を描いてみる var circle = new createjs.Shape(); circle.graphics.beginFill("#FF0000"); circle.graphics.drawCircle(0, 0, 150); circle.graphics.endFill(); circle.x = 250; circle.y = 250; main.mainStage.addChild(circle); main.mainStage.update(); |
上手くいけば以下のように半径150pxの赤丸が描かれます。
次にアニメーションを付けたサンプルはこちらになります。アニメーションに必要なプロパティをグローバル変数にして、tick内でアニメーションの処理をしています。
|
1 2 3 4 5 6 7 8 9 10 11 12 13 14 15 16 17 18 19 20 21 22 23 24 25 26 27 28 29 30 31 32 33 34 35 36 37 38 39 40 41 42 43 44 45 46 47 48 49 50 51 52 53 54 55 56 57 58 |
/** @define {string} */ var BUILD = "debug"; (function(){ function Main(){} Main.main = function() { var main = new Main(); if (!window.HTMLCanvasElement) { alert("Your browser does not support HTML5 Canvas."); return; } else main.initialize(); // entry point main.createCircle(); } var radius = 30, speedX = 3, speedY = 5, circle; Main.prototype.createCircle = function() { circle = new createjs.Shape(); circle.graphics.beginFill("#FF0000"); circle.graphics.drawCircle(0, 0, radius); circle.graphics.endFill(); circle.x = 250; circle.y = 250; this.mainStage.addChild(circle); } Main.prototype.initialize = function() { this.mainCanvas = document.getElementById("mainCanvas"); this.mainStage = new createjs.Stage(this.mainCanvas); this.mainStage.snapToPixelsEnabled = true; createjs.Ticker.addListener(this); createjs.Ticker.useRAF = true; createjs.Ticker.setFPS(60); } Main.prototype.tick = function(event) { circle.x += speedX; circle.y += speedY; if(circle.x - radius < 0 || circle.x + radius > this.mainCanvas.width) speedX *= -1; if(circle.y - radius < 0 || circle.y + radius > this.mainCanvas.height) speedY *= -1; this.mainStage.update(); } window.Main = Main; })(); |
上手くいけば以下の様になります。


3 Comments
[…] CreateJS エディタ編(FlashDevelop)に引き続きPhpStorm版です。 […]
[…] CreateJS エディタ編(FlashDevelop) http://www.mztm.jp/2013/02/18/createjs-エディタ編(FlashDevelop) […]
[…] FlashDevelopにはCreateJSを書くための設定があるのは、先日「CreateJS エディタ編(FlashDevelop)」で紹介しました。 ただし、PCの環境によっては、先に紹介されたそのままだとエラーが出てしまうこともあります。 ここでは、Javaのパスが指定されてないエラーの解決方法を紹介します。 今回紹介するのは、FlashDevelopでCreateJSをコンパイルしようとしたときに、次の画面のようなエラーが出る場合です。 […]